Disclaimer: This post includes affiliate links that I may get compensation from if you decide to make a purchase. Thank you for the support!
Crochet with Me!!  Brand new weekly crochet segment…

Crochet with Me!! Brand new weekly crochet segment…

Crochet with Me

Join me each week  for my new segment.. Crochet with Me!!

How would you like to hang out with a group of girlfriends and make fun, fabulous afghans??  You have found the right place!!  Every couple of months I will pick a fun afghan to make… I will post the link to the free pattern by a great designer and we will get hookin’!!   Each week I will assign a few rows to complete by our next segment,,, Yep.. You guessed it~ This is a Crochet Along!

I will post a new “Crochet with Me” segment each week to show my progress with the featured afghan…  I will talk about the pattern, the designer, the yarn and stitches used in the  project… For those of you who join me on this fun adventure… You can email me you progress photos and I will include your photos in the segment too!!

Are you ready to Crochet with Me??  Let’s get started!!

For our first project I have chosen an afghan I have been wanting to make for years… The Vintage Fan Ripple Afghan!

wink-acreativebeing-vintage-fan-ripple-crochet-afghan-blanket-3

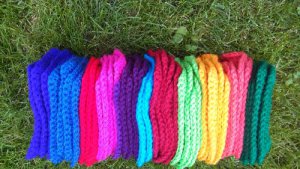
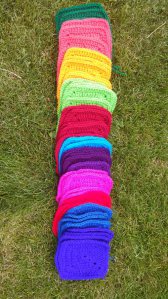
Vintage Fan Ripple Afghan…

 Photo is  from ~ A Creative Being’s version of this great afghan…


This pattern has been around forever, You can find several patterns for this around the web!  I have chosen to use the pattern and tutorial that was provided by Wink over at A Creative Being!!  She has a great eye for color and her photo tutorial is wonderful too!! So… Let’s get started!!  Here is what you will need to get started…

Head over to A Creative Being’s website to grab the instructions… and make sure you say hi while you are there!! Click Here for the pattern…

Next… Gather your supplies… Yarn, hook and other crochet necessities!

Then… Get Hookin’!!

Weekly Row Assignment…  Choose how large you would like your afghan to be and Complete 2 color segments… She has this listed in steps instead of rows… So it will be step one, then repeat step 2-5 twice for two color sections… Each section of color is a repeat of steps 2-5!

I cant wait to see how we do with our first couple rows… Make sure to email me you pictures for next weeks Crochet with Me segment!!


Yarn

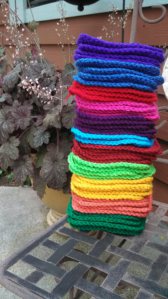
Here is the yarn I have chosen… It is Red Heart Yarn… I am sooooo excited to see how this turns out!!

Happy Crocheting… See you next week for Crochet with Me!!

Elena

Amazing Grace Baby Blanket

Amazing Grace Baby Blanket

The Amazing Grace Baby Blanket is the 8th pattern in the Amazing Grace Free Crochet Pattern Series!   All of the patterns in the Amazing Grace Series have the same signature stitch pattern and are dedicated to Cancer Awareness.  This adorable baby blanket was designed for children and babies who are suffering or recovering from any illness or tragedy. Along with all the other Amazing Grace Free Patterns, I encourage you to make these for yourself and to pay it forward by donating a finished item to someone who is suffering or recovering from illness…  It also makes great gifts and is fun and easy to make!!


Amazing Grace Baby Blanket

Click Here ~ If you love this pattern,,, You can add it to your Ravelry Favorites and Queue for easy access!!


Materials:

Worsted Weight Yarn – 5 Colors – 256 Yards Each

Shop for your yarn needs at Michaels Craft Store Online!! Affiliate Link

I used Red Heart Soft Baby Steps ~ 1 skein each White, Lime, Strawberry, Lavender and Aqua

Hook Size I

Scissors


Measurement:

41″ x 38″


Stitches:

St – Stitch     Sl St – Slip Stitch     Sk – Skip       Ch – Chain      Sc – Single Crochet     Dc – Double Crochet     Hdc – Half Double Crochet

Instructions:

*Make 4 Strips -Approx. 7″ x 35″ each

Amazing Grace Strips

Chain 33

Row 1:     Sc in 2nd Ch from hook, Sk 1 St, *(Sc, Ch 2, Sc) all in the next St, Sk 2 Sts*, Repeat * * across to the last 3 Sts(you will have skipped 2 Sts leaving 3 more stitches),  make one more (Sc, Ch 2, Sc) in next St, Sk 1, Sc in the last St. = 10 (Sc,Ch 2, Sc) spaces and 2 Scs

Row 2:     Ch 3 (Counts as Dc now and throughout), Turn, *3 Dc in next Ch 2 Space (shell made)*, Repeat  * *across, Dc in last St. = 2 Dc and 10 Shells

Row 3:     Ch 1, Turn, Sc in 1st St, Sk 1 St,  (Sc, Ch 2, Sc) in next St (This is the center stitch of the shell), *Sk 2, (Sc, Ch2, Sc)in next St* Repeat * * 8 more times, Sk 1 St, Sc in last St. = 2 Sc  and 10 (Sc, Ch 2, Sc) spaces.

Rows 4 – 69:     Repeat Rows 2 and 3

Row 70:     Repeat Row 2  *Note the right side of the strip is now facing you… This is important for joining!

Joining:

Joining

*Important*  When joining make sure all the strips are facing the same direction with Row 70 for each strip  at the top!

To Join:     With white yarn and first 2 strips right sides up and strips next to each other, you will be working up the sides of the rows. Join with Sl St to bottom corner (row 1) of 1st strip, Ch 1, Sc in same St, Ch 1, Sc in 1st St of 2nd Strip (See Photo).


Joining Strips

Now to continue joining… *Ch 1, Sc in Dc Row space on first strip, Ch 1, Sc in Dc Row space on Second strip(directly across from each other), Ch 1, Sc in Sc Row space of  first strip, Ch 1, Sc in Sc Row space of 2nd Strip (directly across from each other again)* See Photo. Repeat* * to top of strips. Sc in top of 1st strip, Ch 1, Sc in top of 2nd Strip. Finish off.   *Make sure to Ch 1 after each Sc stitch to keep the joining stitches nice and flat. = 142 Sc total


joining strips (2)

Join other strips in the same manner.

Boarder:

With white yarn, Join with Sl St to  top right corner of blanket.

Row 1:     Ch 1, Sc in Same St, *Sc in each St across the top of the 1st strip (32 Sc per Strip), Sc 2 Sts evenly across the joining section*, Repeat * * across to 1st corner, (132 Sc across the top edge, not including Corner Sts), 3 Sc in 1st corner, Working down the side of rows, Sc 105 evenly to 2nd corner, Sc 3 in 2nd Corner, Sc 132 evenly across the bottom to corner, 3 Sc in 3rd corner, Sc 105 evenly up the side of rows to last corner, 2 Sc in 4th corner, Join with Sl St to 1st Sc to complete 4th corner. = 486 Sc

Row 2:     Ch 2(counts as Hdc now and throughout), *Hdc in each St across to corner, 3 Hdc in corner*, Repeat * * Around, Ending with 3 Hdc in last corner. Join to beginning Ch 2 with Sl St.  = 494 Hdc

Row 3:     Repeat Row 2 = 504 Hdc

Row 4:     Repeat Row 2 = 512 Hdc

Row 5:     Ch 1, Sc in same St and each St across to corner, 3 Sc in corner, *Sc across to next corner, 3 Sc in corner*, Repeat * * Around. Join with Sl st to beginning Sc, finish off.  = 520 Sc


Congratulations… You now have an Amazing Grace Baby Blanket!!!

*To modify this blanket into an adult size afghan,,, You can add more rows to each strip to obtain the desired length.  And make as many strips as you like for the width!!

Amazing Grace Baby Blanket close up

Happy Crocheting!!

Elena


©Copyright 2016 Elena Hunt/Beatrice Ryan Designs.  All of my patterns and posts are my own work. Do not copy them in any way. If you want to share this information with someone, share the link to this post. If you want to share on your own blogwebsite or social media, then you may use the first photo in this post and link back to this post. You may not give away printed copies of this post. Thank you. This post may contain affiliate links/ads. If you purchase something from a link in this post, I may be compensated.


Throw Back Thursday Crochet… One year ago today!!

Throw Back Thursday Crochet… One year ago today!!

On year ago today I posted about my second True Colors Afghan… You can read the short post Here!  My Grandson still loves his True Colors Afghan which was the first one I made!!

wpid-img_20130706_193727_881

1st True Colors Afghan…

The post goes on to chat about the second one I was getting ready to join… Funny, I put it away and haven’t finished it yet… Do any of you do that… Yep… A year later and it is halfway joined!!  I need to get this great afghan out and finish it up!!!

wpid-img_20130724_132148_431 wpid-img_20130724_132320_701 wpid-img_20130724_132401_196

Here are the squares ready to go… I have started joining them with black yarn… It probably wont take long to finish!!!  Why do we put projects away??

.

I also posted about finishing up a great hat I was working on Southern and Sassy Summer Hat by ELK Studio Handcrafted Crochet Designs… Kathy is currently giving away some of her patterns for free for a short time and this great hat  is one of the hats on the list!!!  Hop over and get the code!!

I did finish this project… Yay, and I loved the way this hat turned out…  What do you think!!

wpid-IMG_20130726_092108_398.jpg

Southern and Sassy Summer Hat…

Well that’s Throw Back Thursday, One year ago today… Thanks for stopping by!!

Happy Crocheting!!

Elena

%d bloggers like this: