Disclaimer: This post includes affiliate links that I may get compensation from if you decide to make a purchase. Thank you for the support!
2023 Crochet with Me Temperature Afghan CAL… Season 1 – Day 1

2023 Crochet with Me Temperature Afghan CAL… Season 1 – Day 1

Welcome to the 2023 Crochet with Me Temperature Afghan CAL… Season 1 – Day 1!!!
This will be a 4 season project, each season is 3 months long starting today and will be lapghan size! You can make one season, all 4 seasons or turn it into one extra large afghan!!!

All you need to do to participate is start your project! You can get the posts by email by signing up in the “Stay Connected” section in the right sidebar, getting the posts in the Facebook CAL Group or just coming back here for each post. Also, you can add this to your Ravelry queue/favorites for easy access! Click here to go to Ravelry!!!

The pattern is Apache Tears and a 7 row repeat. So, today we will do row 1 (row 1 & 2 are base rows) in the temperature color of today. Over the 9 days I will post the next 8 rows(in my temps), then you will continue the 7 row repeat throughout and I will post weekly progress posts! You will use your own temperature colors, so everyone will be a bit different. You can follow the yarn I posted by Hobby Lobby(I Love This Yarn) or choose your own brand and temperature color scheme. The most important thing is you have a different color for each of the temperature ranges. You can also use your stash or scraps!!

Below you will see a full color picture of the yarn colors and temps that I suggest for a large temperature variance. Also, I have listed how I am dividing my temperatures which is slightly different from the main photo. My local temps range between low 10’s to high 90’s year round. So I adjusted my scale so I can use all 25 colors listed and the color ranges are smaller increments. In addition, there is a special color for days you choose.. it can be holidays, birthdays, special occasions or even historical events. You don’t have to use the special color,,, Just an option.

Below are my color/temp choices based on my hometown average temperatures, I have divided it up differently than above so I can use all the colors I purchased.

  • <24 White
  • 25-27 Light Gray
  • 28-30 Greybeard
  • 31-33 Soft Pink
  • 34-36 Pink
  • 37-39 Hot Rose
  • 40-42 Hot Orchid
  • 43-45 Mixed Berry
  • 46-48 Purple
  • 49-51 Navy
  • 52-53 Royal
  • 54-55 Peacock
  • 56-57 Turquoise
  • 58-59 Medium Blue
  • 60-61 Jelly Bean
  • 62-63 Limelight
  • 64-65 Buttercup
  • 66-67 Yellow
  • 68-69 Sungold
  • 70-71 Desert Glaze
  • 72-73 Burnt Pumpkin
  • 74-75 Red
  • 76-77 Fire Red
  • 78-79 Cranberry
  • 80> Auberine

To choose your color/temperature you can use a specific time of day, the high or low, the average for the day(that is what I am choosing), only your hometown or the temperature where you are each day! If you use the average temp, you may be crocheting the next day for the previous day temp…. That is ok… You will just start crocheting on the 2nd of January if you want to do it that way!

Here is the Magnetic Fridge Calendar for all of 2023 that I will be using for record keeping… Easy to order from Amazon!

For all of the materials and information(including how the prizes for this year work) Click Here!

Also, you can come back anytime and get the material list and instructions in the Crochet with Me tab at the top of the page

I am so excited to start! Mine will be made in the full year so there will be 365 rows! The project is made lengthwise and you will leave the tails(6″-12″ your choice) as the fringe… So no weaving in the ends unless you want too!

Each row you will finish off leaving the tail at the beginning and end. You will NOT TURN, just join your yarn in the next row in the first stitch of the righthand side.

Mine is 65″ wide without the fringe


Q & A for the 2023 Crochet with Me Temperature Afghan CAL

  • Do I need to use the Hobby Lobby I Love Yarn? – No, you can use any brand and either use colors that are the same tone or make up your own color scheme
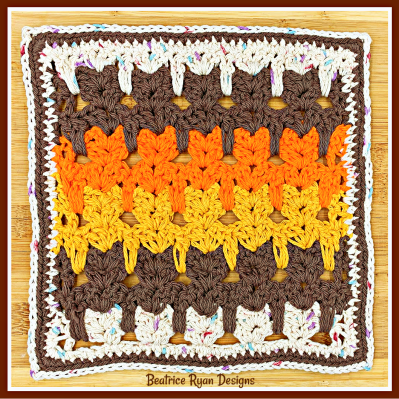
  • What if my temperatures are lower or higher than in the range posted? – You can adjust your range by moving the color scale up or down. If you want to use a smaller range, you can use smaller increments too and use less yarn colors. I have adjusted my personal scale to fit my local area and the sample of mine is below.
  • How does a 4 Season project work? – A season is a 3 month period, you can stop at the end or each season or continue and make 2 seasons together or continue and make the full year. You can also make each season and join them together later.
  • How do you know what temp to use each day? -You can use a weather app such as Weather.com to track your local temps. You can choose a time of day to look, the high or low or the average. Weather.com also has a monthly calendar so you can see the temp history incase you miss a day. Also, you can choose to just use the temps in your hometown or you can use them for where you are each day at the time you choose.
  • Joining new colors? -You will finish off each row leaving your tail. Without turning for the next row you will move to the first stitch on the righthand side and join your yarn. Another words, you will always work/start your new row on the right side.
  • How large will this be? – The project is worked length wise, so it will be approximately 65″ long not including fringe. The width for each season will be approximately 30-36″ wide depending on your tension. If you do a full year the width will be extra large somewhere around 125″, the original 65″ is the same and then you may use the lengthwise direction differently than if you stop at the seasonal lapghan style.
  • How do I join? – EASY, you can just come back here anytime and scroll through the feed, go to the Crochet with Me tab at the top of the page and get all the posts, Use the “Stay Connected” form on the right sidebar to get all posts by email or join the Beatrice Ryan Facebook CAL Group and posts are in the pinned area there.
  • What if I am behind? – You can get all of your daily historical temperatures on Weather.com and catch up!
  • Prizes? – Head to the Material List Post for all the info on the prizes

Here we go! 2023 Crochet with Me Temperature Afghan CAL Day 1!

Stitches:

  • Ch – Chain
  • St – Stitch
  • Sc – Single Crochet
  • More stitches will be added as pattern increases

January 1st 2023 (Holiday so I am using my “Special Color” Teal Sparkle

H Hook

Ch 206

Row 1: Ch 1, sc in 2nd chain from hook and each across. = 205 sc Finish Off

That is it for day 1, January 1st! Come back tomorrow for day 2 instructions!


Also, Don’t forget to follow me on my social media sites for more fun!

FacebookTwitterInstagramMy CAL Facebook Group, and Pinterest

I hope you love this project!!  Finally, make sure to share your finished projects on my Beatrice Ryan Designs Facebook Page and make sure to share around social media too! Why share?? Because it shares our Love of Crochet!!

Happy Crocheting!!

Elena


©Copyright 2023 Elena Hunt/Beatrice Ryan Designs.  All of my patterns and posts are my own work. Do not copy them in any way. If you want to share this information with someone, share the link to this post. Additionally, If you want to share on your own blog, website or social media, then you may use the first photo in this post and link back to this post. You may not give away printed copies of this post. Thank you. This post may contain affiliate link

Apache Tears Dishcloth… Free Crochet Pattern

Apache Tears Dishcloth… Free Crochet Pattern


The Apache Tears Dishcloth packs a punch of color and fun! Using 2 simple stitches that create this fun textural effect, you can use up all of your scraps, create your own unique color combo and then enjoy!

This is Week 12 of the 2022 Fall Gift Giving Crochet Along… The final week! I hope you have enjoyed this 12 week – 12 dishcloth CAL!!! Stay tuned for more fun, free patterns and the 2023 Winter Crochet With Me Afghan CAL… Details coming soon!

The great thing about this pattern, you don’t have to weave in ends! I hope you give it a try, it is much easier than it looks!!! Also there is a YouTube Video to show you how easy it really is!

Also, all 12 of the dishcloth patterns will be available in an Ebook PDF soon… $5.99 and it will be available on Ravelry… I will post that here when available!

Please add this to your Ravelry Favorites for easy access too!! Click Here…


Grand Prize details and past 11 patterns of the 2022 Fall Gift Giving CAL:

Grand Prize – Thanksgiving Weekend I will post fan pictures that are entered to me by email of the finished dishcloths… One lucky winner will receive a $50 Amazon Gift Card. Here are the rules… By Friday November 25th, 2022 11:59pm PST US you will email me a picture of your finished CAL dishcloths (6 of the patterns minimum all in one picture) to [email protected]. One entry per person. Each entry will be numbered and I will use a Random Number Generator to draw the winner on Sunday November 27th 2022 and post the Fan Gallery and winner that afternoon.

Waffle Stitch Textured Dishcloth – Week 1

Waffle Stitch Dishcloth

Summer Squiggles Dishcloth – Week 2

Summer Squiggles Dishcloth

Bavarian Stitch Dishcloth – Week 3

Bavarian Stitch Dishcloth

Alpine Stitch Dishcloth – Week 4

Autumn Acorn Dishcloth – Week 5

Autumn Acorn Dishcloth

Optical Illusion Dishcloth Week 6

Simple Cluster Dishcloth Week 7

Easy Cat Dishcloth Week 8

Easy Pumpkin Dishcloth Week 9

Easy V-Puff Dishcloth Week 10

Simple Chevron Dishcloth Week 11


Now on to Week 12 – Apache Tears Dishcloth

Tips:

  • It is super easy, there are NO ends to weave in for this project.
  • You can choose any color scheme to make it your own.
  • A minimum of 2 colors is required to get the effect
  • You will not turn after row 2, just finish off and move back to the right hand side to start the next row. Another words you always work on the right side of the project.
  • You will change colors every row
  • You always start and end each row with a sc, all the stitches in between are worked in the front loop
  • Each row move the fldc over one st to create the look
  • Make sure not to blsc in the st you used for the fldc
  • Leave a 2″ tail on both the beginning join side and finish off side

Size:

9 1/2″ x 9 1/2″

Materials:

Yarn: 150 total Yards of Cotton Yarn

I used the following:

Color A – Purple Color B – Orange Color C – Green

Color D – Blue Color E – Yellow Color F – White

Hook: G

Stitches:

  • St – Stitch
  • Ch – Chain
  • Sc – Single Crochet
  • Dc – Double Crochet
  • Bl – Back Loop
  • Fl – Front Loop

Here is a link to a great YouTube Video that shows how to do this pattern. Keep in mind, She uses a 6 st repeat and I use a 5 stitch repeat. Click Here

Instructions:

Changing colors each row, below are the color scheme I did. Starting with the ch row and row 1: A, B, C, D, E, F. After Row 1 you will finish off each row and without turning, join the next color to the first st on the righthand side.

Starting with Color A, Ch 38

Row 1 : Sc in 2nd ch from hook and each across = 37 sc Finish off and Move to the RH side to join next color

Row 2: Ch 1, sc in 1st st, blsc in the next 35 sts, sc in last st. = 2 sc & 35 blsc Finish off and Move to the RH side to join next color

Row 3: Ch 1, sc in 1st st, *Dc in fl of st 2 rows below (color A), Pic below, blsc in next 4 sts*, repeat *to* across, sc in last st. . = 7 fldc , 2 sc & 28 blsc(all rows now will have this count). Finish off and Move to the RH side to join next color

Row 4: Ch 1, sc in 1st st, bl sc in next st(a dc st), * fldc in next st 2 rows below(color B row), blsc in next 4 sts*, repeat *to* 5 more times, fldc in next st 2 rows below, blsc in next 3 sts, sc in last st. Finish off and Move to the RH side to join next color

Row 5: Ch 1, sc in 1st st, bl sc in next 2 sts, * fldc in next st 2 rows below(color c row), blsc in next 4 sts*, repeat *to* 5 more times, fldc in next st 2 rows below, blsc in next 2 sts, sc in last st. Finish off and Move to the RH side to join next color

Row 6: Ch 1, sc in 1st st, bl sc in next 3 sts, * fldc in next st 2 rows below(color d row), blsc in next 4 sts*, repeat *to* 5 more times, fldc in next st 2 rows below, blsc in next st, sc in last st. Finish off and Move to the RH side to join next color

Row 7: Ch 1, sc in 1st st, *blsc in next 4 sts, fldc in next st 2 rows below*, repeat *to* across, sc in last st. Finish off and Move to the RH side to join next color

Rows 8 – 35: Repeat rows 3-7 changing colors in the same sequence.

Tails

Tie simple knots with every 2 tails together down both sides to secure tails. With a fine tooth comb or brush, brush out each tail to separate all the strands. Trim brushed fringe to a 1″ length(or desired length)

Lightly block to shape and make fringe lay flat

This is a picture of the back of the project!

That’s it!!! You now have an Apache Tears Dishcloth!! Enjoy and make as many as you can for gifts.

I have so much enjoyed this 2022 Fall Gift Giving CAL. I love seeing all of the finished projects in the Beatrice Ryan Designs CAL Facebook Group !!! Please share your pictures with your friends too!


This Week’s Amazon Favorite! Liquid Motion Sand Art… This year the girls in my family are getting one for Christmas… I know they will love them!!!


Also, Don’t forget to follow me on my social media sites for more fun!

FacebookTwitterInstagramMy CAL Facebook Group, and Pinterest

I hope you love this project!!  Finally, make sure to share your finished projects on my Beatrice Ryan Designs Facebook Page and make sure to share around social media too! Why share?? Because it shares our Love of Crochet!!

Happy Crocheting!!

Elena


©Copyright 2022 Elena Hunt/Beatrice Ryan Designs.  All of my patterns and posts are my own work. Do not copy them in any way. If you want to share this information with someone, share the link to this post. Additionally, If you want to share on your own blog, website or social media, then you may use the first photo in this post and link back to this post. You may not give away printed copies of this post. Thank you. This post may contain affiliate link

Autumn Acorn Dishcloth! Week 5 – Fall Gift Giving Crochet Along!!

Autumn Acorn Dishcloth! Week 5 – Fall Gift Giving Crochet Along!!


Autumn Acorn Dishcloth! Whip up this fun and easy crochet dishcloth, you will be amazed at how easy it is! This is part of the 2022 Fall Gift Giving CAL 12 weeks – 12 Dishcloths. In week 5 you will be using 2 colors of cotton yarn. Basically, because you use simple stitching techniques – it works up quickly!

Accordingly, this week you will be using Slip Stitch, Chains, Single Crochet, Half Double Crochet and Treble Crochet, in other words – Easy Peasy!

In addition, you can easily find this pattern by adding it to your Raverly queue/favorites… Click Here!


How to participate:

Firstly -You can come here each Sunday and see the posts. Secondly-You can head to the Crochet With Me Tab at the top of the page. Thirdly-You can subscribe by email for all posts in the “Stay Connected” in the right sidebar or Lastly- Join the Beatrice Ryan Designs CAL Facebook Group Get posts, tips and help along with fun games and prizes .


Below are the first 4 weeks. They are so much fun!

Waffle Stitch Textured Dishcloth – Week 1

Summer Squiggles Dishcloth – Week 2

Bavarian Stitch Dishcloth – Week 3

Alpine Stitch Dishcloth – Week 4


Now on to Week 5….

Tips:

  • Make sure to do your chain stitches and slip stitches loosely, because we don’t want them to pull.
  • When working your Hdc rows, make sure you don’t miss the last stitch of each row… Basically, easy to miss.
  • For the base, when working HDC rows, the Ch 1 DOES NOT count as a st, make it loose
  • You can sew the top and base together if you prefer not to use the recommended sl st technique.
  • The bumpy technique on the top of the acorn is made by alternating sc and trc, The trc pushes out to the opposite side to create a easy bobble effect.
  • The rightside is with the trc bobble facing you.
  • You will have rows that increase/decrease, so pay attention to the stitch count
  • Lastly, If your piece seems to pull or curl, you will steam block at the end to shape.

Materials:

Yarn: 150 Yards of Cotton Yarn, about 75 yds each of 2 colors. I used Peaches & Cream in Color A – Dark Taupe(brown) and Color B – Panorama(cream w/speckles) *To clarify, you can choose any color scheme instead so you can make it your own.

Hook: G

Stitches:

  • Ch – Chain
  • St – Stitch
  • Sk – Skip
  • Sl St – Slip Stitch
  • Sc – Single Crochet
  • Hdc – Half Double Crochet
  • Trc – Treble Crochet
  • Decrease Sc – Insert hook in 1st st, pull up loop, insert hook in next st, pull up loop, yo and draw through all 3 loops
  • Decrease Hdc – Yo, Insert hook in 1st st, pull up loop, insert hook in next st, pull up loop, yo and draw through all 4 loops

Instructions:

Importantly, make sure to read the tips above. They are most important to success!

Color A – Brown Color B – Cream

Top of Acorn

Starting with Color A, chain 26

Row 1: Sc in 2nd ch from hook and each across. = 25 sc

Row 2: Ch 1, turn, sc in st, *trc in next st, sc in next st*, repeat *to* across. = 13 sc & 12 trc

Row 3: Ch 1, turn, 2 sc in 1st st, sc across to last st, 2 sc in last st. = 27 sc

Row 4: Ch 1, turn, sc in st, *trc in next st, sc in next st*, repeat *to* across. = 14 sc & 13 trc

Row 5: Ch 1, turn, 2 sc in 1st st, sc across to last st, 2 sc in last st. = 29 sc

Row 6: Ch 1, turn, sc in st, *trc in next st, sc in next st*, repeat *to* across. = 15 sc & 14 trc

Row 7: Ch 1, turn, sc across. = 29 sc

Row 8: Ch 1, sc in 1st 2 sts, *trc in next st, sc in next st*, repeat *to* across, sc in last st. = 16 sc & 13 trc

Row 9: Ch 1, decrease sc over 1st two sts, sc across to last two sts, dc sc over last 2 sts. = 27 sc

Row 10: Ch 1, sc in 1st 2 sts, *trc in next st, sc in next st*, repeat *to* across, sc in last st. = 15 sc & 12 trc

Row 11: Ch 1, decrease sc over 1st two sts, sc across to last two sts, dc sc over last 2 sts. = 25 sc

Row 12: Ch 1, turn, decrease sc over 1st two sts, sc in next 10 sts, (sc, ch 6, sc in 2nd ch from hook sc in next 4 chs, sc in same) all in the same st *this is the stem, sc in next 10 sts, decrease sc in over next 2 sts, sc 11 sts evenly down row ends, sc in next 25 sts(row 1), sc 11 sts evenly up row ends, join with sl st to beginning sc. = 2 decrease sc, 67 sc & the stem

Finish Off, you are now done with the top of the acorn.

Acorn Base

Starting with Color B, chain 16

Row 1: Sc in 2nd ch from hook and each across. – 15 sc

Row 2: Ch 1, turn, hdc across to last 2 sts, 2 hdc in last st. = 16 hdc

Row 3: Ch 1, turn, 2 hdc in 1st st, hdc in each st across. = 17 hdc

Rows 4-10: Repeat rows 2 & 3 increasing in each row accordingly, ending with 24 hdc in row 10

Row 11: Ch 3(this will form the tip of the acorn), decrease hdc over next 2 sts, hdc across. = 23 hdc and the ch 3 for the stem

Row 12: Ch 1, turn, hdc across to last 2 sts, decrease hdc. = 22 hdc

Row 13: Ch 1, turn, decrease hdc, hdc across. = 21 hdc

Row 14-19: Repeat rows 12 & 13 decreasing in each row accordingly, ending with 15 hdc in row 19

Row 20: Ch 1, turn, sc across. = 15 sc

Finish off, weave in ends

Joining the top and base

Using color A

Wrong sides facing(the top has bumps on the RS, the base doesn’t matter), you will be working along the bottom edge of the top section of the acorn in the sl sts and along the top row edges of the base. You will be working through one row edge and the corresponding bl of the top at the same time.

You can use the sl st technique below, or you can sew them together making sure the base is slightly behind the top when joining.

Joining

Using a sl st, join in the top right corner row edge of the base to the back loop of the acorn top in the bottom row right corner(see pic above showing how to stitch), continue to sl st the row end of base and back loop of top together all the way across.

Base Edging: Continuing with Color A

Row 1: Sl st in next back loop of the acorn top(bottom left corner) to secure this to the beginning of the edging, working down side of base sc sts – sc in the next 15 sts(see pic above), sc 11 sts evenly down side rows of acorn base to ch 3 tip you made in row 11, working in the ch 3 – sc in 1st ch, (sc, ch2, sc) in 2nd ch, sc in 3rd ch, sc 11 sts evenly up side edge rows of base, sc in next 15 sts, sl st in the back loop of the bottom right corner of the acorn top to secure. = 2 sl sts, 52 sc & (sc, ch2, sc)

Row 2: Turn(now the RS should be facing you), loosely sl st in the next 27 sts, 2 sc in the ch 2 space, sl st in next 27 sts, sl st in the back loop of the top base to secure. = 54 sl sts & 2 sc

Lastly

Finish off and weave in any ends

Additionally, steam lightly to shape if needed so you have a great dishcloth! In addition, it will make it softer.

Wow, that’s it!!! You finally have a Autumn Acorn Dishcloth… So, enjoy and see you soon!!! See you right back here next week for week 6 of our 2022 Fall Gift Giving CAL!


This week’s Amazon Favorites:

This week I want to share my skin care routine. I have used Purity Made Simple by Philosophy for many years, it is so gentle and cleans all of my makeup off really well. In addition, I recently this summer I started using Confidence in a Cream(both the day and night version) by It Cosmetics. I have started to notice a change for the good and I am so pleased.

In conclusion – I love these products and hope if you are looking for skincare, you will give it a go! A little goes a long way, so this means they last a long time – Besides that, you get a great bang for your buck!

This is a recent picture of me at 59 years old, no filters used. I have make-up on. I do have good skin naturally, thanks to both of my parents. In addition, good skincare(that my mother taught me) is also a key to having great skin!


Don’t forget to follow me on my social media sites for more fun!

FacebookTwitterInstagramMy CAL Facebook Group, and Pinterest

I hope you love this project!!  Make sure to share your finished projects on my Beatrice Ryan Designs Facebook Page and make sure to share around social media too! Why share?? Because it shares our Love of Crochet!!

Happy Crocheting!!

Elena


©Copyright 2022 Elena Hunt/Beatrice Ryan Designs.  All of my patterns and posts are my own work. Do not copy them in any way. If you want to share this information with someone, share the link to this post. If you want to share on your own blog, website or social media, then you may use the first photo in this post and link back to this post. You may not give away printed copies of this post. Thank you. This post may contain affiliate link

%d bloggers like this: