Disclaimer: This post includes affiliate links that I may get compensation from if you decide to make a purchase. Thank you for the support!
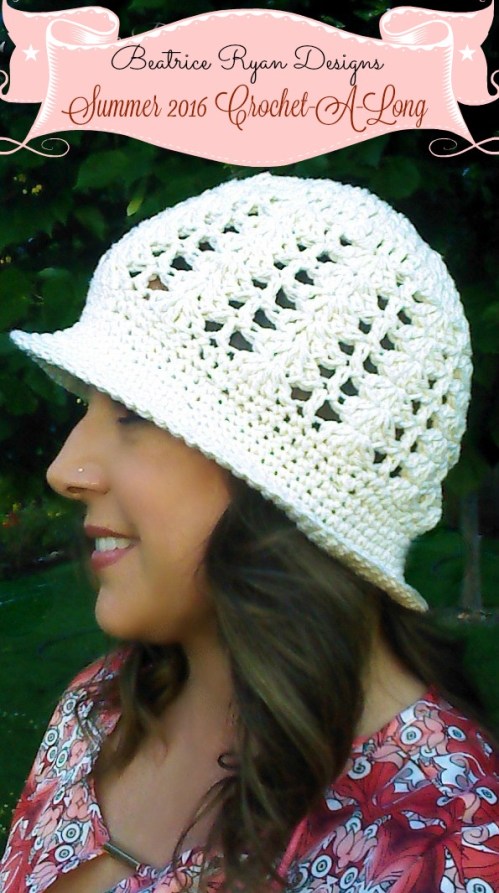
Summer 2016 CAL.. Sunshine and Shells Hat… Week 2~Beginning the Hat!!

Summer 2016 CAL.. Sunshine and Shells Hat… Week 2~Beginning the Hat!!

SUMMER 2016 CROCHET ALONG

SUNSHINE AND SHELLS HAT

Summer 2016 CAL


I’m so excited you are joining me this summer for a quick and easy Crochet Along!!  The Sunshine & Shells Hat is a fun project that is perfect to consider them for summer fashion and best of all… This is a Free Pattern!

This week we will be making the top and crown of the hat…

During last nights live video broadcast on my Facebook page, I showed a tutorial for the Magic Ring and a demonstration of the pattern for the crown of the hat…

If you missed out… head over to the Facebook and take a look!  If you missed week 1, the materials and gauge,,, Click Here…

Now we are ready to get started…


Abbreviations: 

Ch-Chain              Sc-Single Crochet            Dc-Double Crochet          St-Stitch

Special Stitching:

Beginning Shell Pattern:      Ch 3, Skip 2 Sts, 5 Dc in next St, Skip next 2 Sts.

Shell Pattern:                         Dc in St, Skip 2 Sts, 5 Dc in next st, Skip next 2 Sts.

Note: Pattern is worked in the round and all joining stitches are joined to the beginning stitch.

Instructions:

Make a Magic Ring.

Row 1:    Ch 2 (Does not count as a stitch now and throughout), 12 Dc in Magic Ring, Join to beginning Dc. Pull Tail to tighten ring, you will weave this in at the end. = 12 Dc

Row 2:     Ch 2, 2 Dc in each St around, Join to beginning. = 24 Dc

Row 3:     Ch 2, *2 Dc in first St, 1 Dc in next St*, Repeat **around, Join. = 36 Dc.

Row 4:    Ch 2, *2 Dc in first St, 1 Dc in next 2 Sts*, Repeat ** around, Join. = 48 Dc

Row 5:    Ch 2, *2 Dc in first St, 1 Dc in next 3 Sts*, Repeat ** around, Join. = 60 Dc

Row 6:    Ch 2, *2 Dc in first St, 1 Dc in next 4 Sts *, Repeat ** around, Join. = 72 Dc

Row 7:    Chain 3 (Counts as 1st Dc now and  throughout), Skip next 2 Sts, 5 Dc in next St, Skip next 2 Sts (Beginning Shell Pattern made), *Dc in next St, Skip next 2 Sts, 5 Dc in next St, Skip next 2 Sts* Shell Pattern Made, Repeat** 11 times. Join to the top of Ch 3. = 12 Shell Pattern Repeats (including Beginning Shell Pattern).

Rows 8-12:    Repeat Row 7 five times.

Row 13:     Ch 1, Sc around, Join. = 72 sc

Row 14:    Ch 1, *Sc 2 Sts together(decrease made over the next 2 Sts), Sc in next 7 Sts*, Repeat * * around, Join. = 64 Sc

That’s it… Join me next Tuesday on Facebook at 6pm PST for tips and preview of Week 3!!  And, on Wednesday the 15th for the final post…

Happy Crocheting!!

Elena


©Copyright 2016 Elena Hunt/Beatrice Ryan Designs.  All my, patterns and posts are my own work. Do not copy them in any way. If you want to share this information with someone, share the link to this post. If you want to share on your own blog website, then you may use the first photo in this post and link back to this post. You may not give away printed copies of this post. Thank you. This post may contain affiliate links/ads. If you purchase something from a link in this post, I may be compensated.

2016 Summer CAL~Sunshine & Shells Summer Hat!! Week 1~ Materials and Gauge!

2016 Summer CAL~Sunshine & Shells Summer Hat!! Week 1~ Materials and Gauge!

Join me in a 3 week Crochet Along journey!!  Simple and stylish, fun to wear!! Sunshine and Shells Summer Hat…

Summer 2016 CAL


If you are ready to start a fun project with me… Week 1 is our preparation week!  Buy your yarn and check your gauge…

Here is what you will need…

Materials:    

Yarn:

Lily ~ Sugar and Cream (Pictured in Ecru) 200 Yard Skein, Total for hat, Approx 160 yards…

Hook:

G or H… or whatever hook makes your gauge work.. I used an H and I crochet loosely.

You can choose any worsted weight yarn you like,,, but make sure you check your gauge.. Here is an article about why its important… Gauge and your project

I want your hat to fit… So after you buy your yarn and gather your hook… Match your gauge to this…

Gauge:    

Hook Size ~ H  3″ x 3′    10 Dc x 5 Rows


Next… Watch my live broadcast on Facebook next Tuesday 6/7 for upcoming tips and chat at 6pm PST!!

Then… Tune in here next Wednesday 6/8 for the top and crown of the hat instructions!

I can’t wait to see all of your hats!!

Week 3 we will add the brim and shape the hat… Then Voila… You have a beautiful Summer Hat!!

Happy Crocheting!

Elena


Amazing Grace Blissful Summer Hat… Free Crochet Pattern!

Amazing Grace Blissful Summer Hat… Free Crochet Pattern!

Amazing Grace Blissful Summer Hat


Amazing-Grace Blissful Summer Hat

If you love this hat pattern… Favorite it on Ravelry… Click Here!!


The Amazing Grace Blissful Summer Hat is the 17th Free Pattern in the Amazing Grace Series…  To learn more about this series, click on the Amazing Grace Free Patterns tab at the top of the site.  You may recognize portions of this fun and stylish pattern,,,  Last year I designed the Amazing Grace Blissful Beanie and Amazing Grace Blissful Slouchy… This fun summer hat has many of the same elements, just an awesome bulky cotton yarn and a brim!!


Materials:

Yarn ~ 225 yards total of bulky cotton blend yarn in 2 colors. 175 main color and 50 accent color

Bernet Maker Home Dec yarn in Aqua and  Cream were used in this hat.  This is a fabulous yarn that I highly recommend.

Hook ~ K (or hook size to meet gauge)

Stitches:

St – Stitch     Sl St – Slip Stitch    Ch – Chain     Sc – Single Crochet     HDC – Half Double Crochet     FPSC – Front Post Single Crochet

Gauge:

6 Sc X 7 Rows of Sc = 2″ x 2″

Instructions

Begin with  your main color Aqua and make a Magic Circle (Video Instructions)

Row 1:  Ch 1 (Does not count as 1st St now and through out), 10 HDC in Magic Ring.  Tighten Ring by pulling on loose tail.  Join with Sl St to  top of 1st HDC. = 10 HDC

Row 2:  Ch 1, 2 HDC in 1st St and 2 HDC in each St around, Join to top of 1st HDC. = 20 HDC

Row 3:  Ch 1, *2 HDC in 1st St, Hdc in next St,* Around.  Join with Sl St to top of 1st HDC. = 30 Hdc

Row 4:  Ch 1, *2 HDC in 1st St, 1 HDC in next 2 Sts.* Around.  Join with Sl St to top of 1st HDC.  = 40 HDC

Row 5:  Ch 1, *2 HDC in 1st St, 1 HDC in next 3 Sts* Around  Join with Sl St to top of 1st HDC. = 50 HDC

Row 6:  Ch 1, 1 HDC in each St Around Join with Sl St to top of 1st HDC. =50 HDC

Row 7:  Ch 1, *2 HDC in 1st St, 1 HDC in next 4 Sts* Around  Join with Sl St to top of 1st HDC. = 60 HDC

Row 8:  Ch 1, *2 HDC in 1st St, 1 HDC in next 9 Sts* Around  Join with Sl St to top of 1st HDC. = 66 HDC

Row 9:  Ch 1, *2 HDC in 1st St, 1 HDC in next 10 Sts* Around  Join with Sl St to top of 1st HDC. =72 HDC

Row 10:  Ch 1, *2 HDC in 1st St, 1 HDC in next 23 Sts* Around. Join with Sl St to top of 1st HDC. = 75 HDC

Row 11:  Ch 1, Turn, Work FPSC in each St Around. Join to top FPSC. = 75 FPSC

Row 12:  Ch 1 Turn, Sc in each St Around. Join to top Sc. = 75 Sc

Change to Cream

Row 13:  Ch 1 Turn, Work FPSC in each St Around. Join to top FPSC. = 75 FPSC

Row 14:  Ch 1 Turn, Sc in 1st St, Ch 2, Sc in same St as beginning Sc, Sk 2 Sts, *(Sc,Ch2,Sc) all in next St, Skip next 2 St* Repeat * * Around. Join to beginning Sc. = 25 Ch 2 spaces.

Row 15:  DO Not Turn, Sl St in 1st Ch 2 Sp, Ch 3(Counts as Dc now and throughout), 2 more Dc in same Ch 2 Sp., *3 Dc in next Ch 2 Sp(Shell made)*, Repeat * * Around, Join to top of beginning ch 3 . =25 Shells made.

Row 16: Do not turn, Sl St in next St(2nd St of Shell from Prev Row), Ch 1, Sc in same St, Ch 2, Sc in same St, Sk 2 Sts, *(Sc,Ch2,Sc) all in the next St, Sk 2 Sts*., Repeat * * Around, Join to beginning Sc. = 25 Ch 2 Sps  *Tip-The  (Sc,Ch2,Sc) are all done in the middle St of the  Dc Shells from the previous row

Row 17: Repeat  Row 15

Change back to Aqua

Row 18:  Do not turn, Sc in each St around. Join to beginning Sc = 75 Sc

Row 19:  Ch 1 Turn, FPSC in each St around, Join to beginning FPSC. = 75 FPSC

Row 20 – 22: Ch 1 Turn, Sc in each St Around. Join to beginning Sc. =75 Sc

For the remainder of the hat you will not turn at the beginning of each row.

Row 23:  Ch 1, FPSC in each St around. Join to beginning. =75 FPSC

Row 24:  Ch 1, Sc in 1st 4 sts, 2 Sc in next St, * Sc in next 4 Sts, 2 Sc in next St*, repeat * * 14 times. Join to beginning. = 90 Sc

Rows 25-29:  Ch 1, Sc in each St around. Join to beginning. = 90 Sc

Row 30:  Ch 1, *Sc in next 13 Sts, decrease over the next 2 Sts*, Repeat * * around. Join to beginning. = 84 Sc

Row 31:  Ch 1, Sc in each St around. Join to beginning. = 84 Sc.

Finish off and weave in your ends.

Lightly shape your hat by slightly stretching the inside crown of the hat and the brim.

Congratulations!!  You now have an Amazing Grace Blissful Summer Hat!!

Happy Crocheting~

Elena


Here is one of my favorite photobombs ever… I was in the back yard trying to get a picture… It was fairly cold and sprinkling a bit…  My daughter was out with me all wrapped up in her favorite blanket and of course… Charlie made sure to be in the photo as usual!  When we saw this picture we laughed until we almost cried… Good times!

Amazing Grace Summer Hat Photobomb


©Copyright 2016 Elena Hunt/Beatrice Ryan Designs.  All of my patterns and posts are my own work. Do not copy them in any way. If you want to share this information with someone, share the link to this post. If you want to share on your own blogwebsite or social media, then you may use the first photo in this post and link back to this post. You may not give away printed copies of this post. Thank you. This post may contain affiliate links/ads. If you purchase something from a link in this post, I may be compensated.
%d bloggers like this: